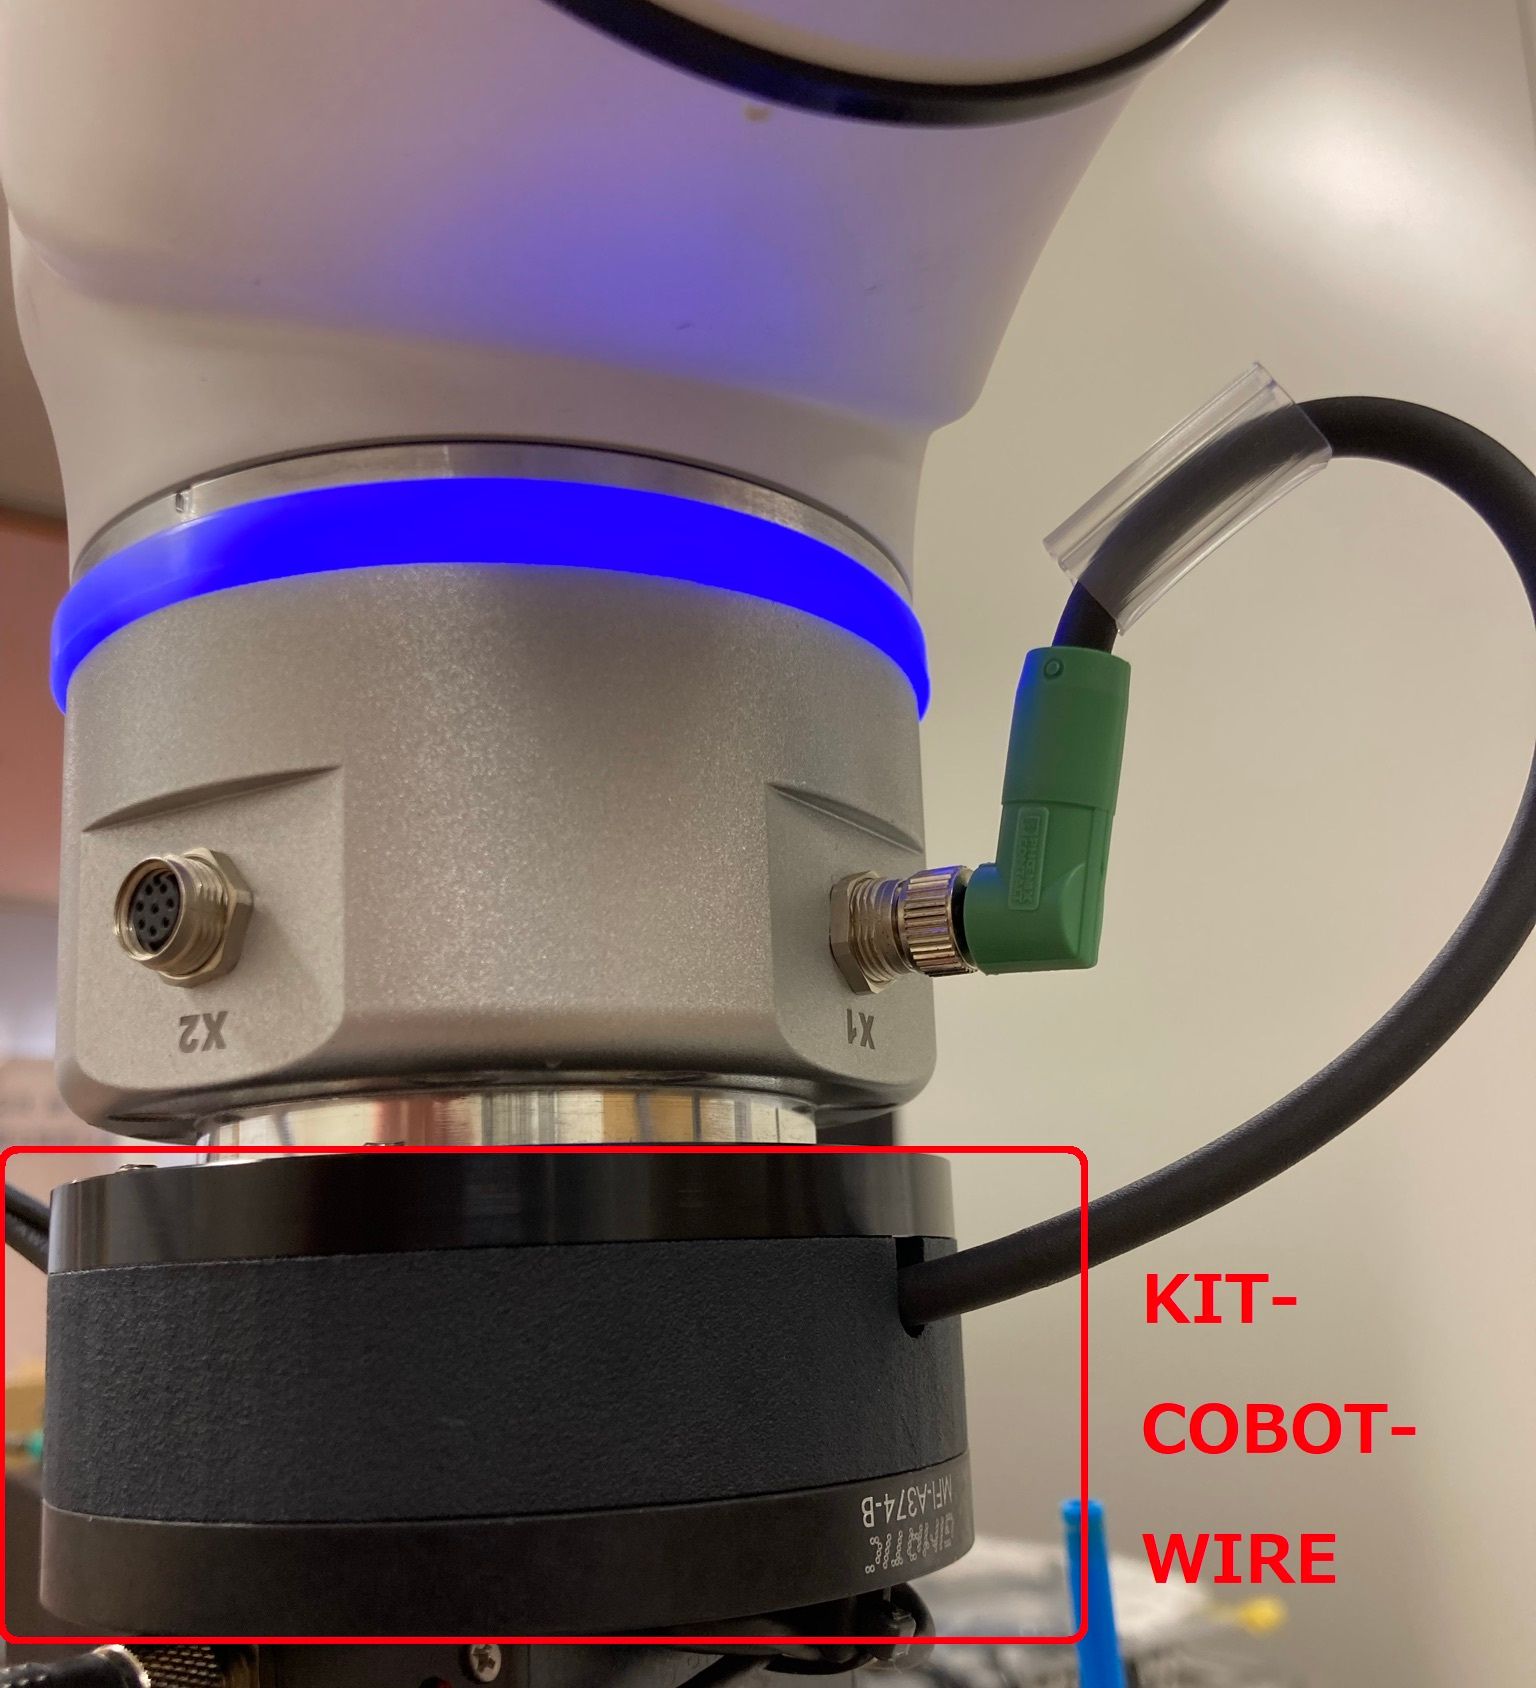
KIT-COBOT-WIRE
協働ロボットの手首部の配線を、すっきりまとめるキット
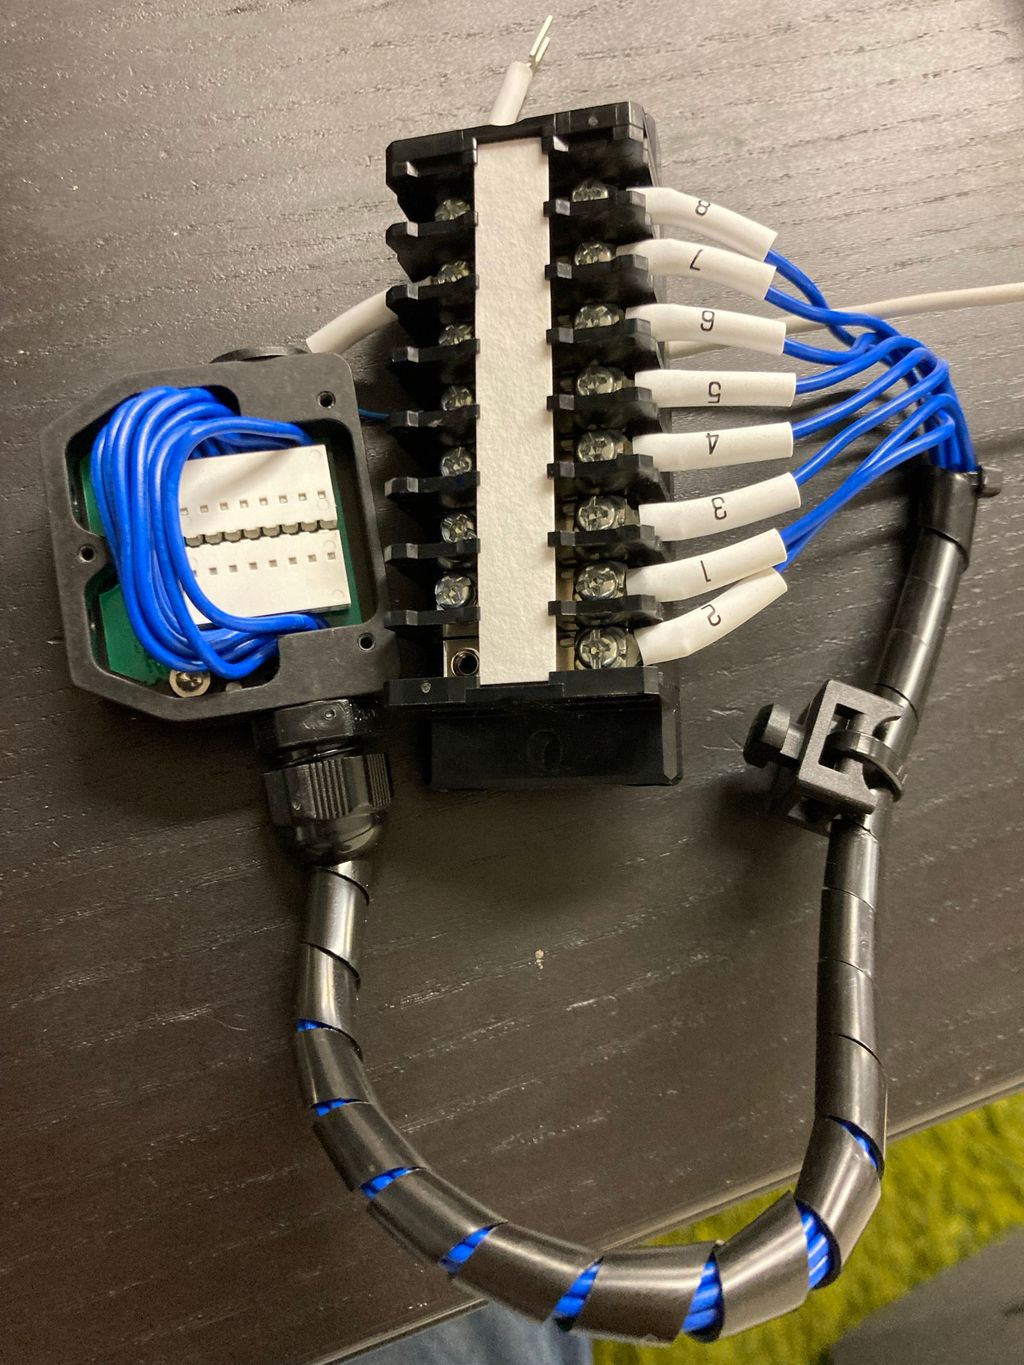
8連端子台を3Dプリンタ製のハウジングの中に組み込み、
ロボットブランドごとに異なるIOの割り付けと、専用に作られたグリッパーを「つなぐ」ためのキット。
8 terminal blocks are built into a 3D printer housing.
Kits for "connecting" different IO assignments for each robot brand and specially made grippers.
型式構成 KIT-COBOT-WIRE + ******
| キット | 配線用 | ロボット側のケーブル仕様 | 対象ロボット |
|---|---|---|---|
| KIT-COBOT- | WIRE | +1404182(M8 8ピンのオスコネクタ:エルボ) | テックマン、DOOSAN |
| +1404171(M8 8ピンのメスコネクタ:エルボ) | UR、FANUC/CR-X、YASKAWA/HC10DTP、JAKA |
キットの概要
協働ロボットの市場シェアの高まりに、弊社をはじめとするグリッパーブランドがご提案する「標準キット」の機能では対応しきれない事例に対応するためのキットです。
その解決策にはエンドーユーザーやSIerで設計・製作をされている独自のハンドを使用されているケースが多く見受けられますが、エアーグリッパーでも電動グリッパーどちらの駆動方式でも課題なる点は配線の取り回しです。
手首部のIOを有効活用し、アーム添いの配線を最低限にするためのキットの1つが「KIT-COBOT-WIRE」シリーズです。
This kit is designed to respond to cases where the functions of the "standard kit" proposed by our company and other gripper brands are not sufficient to handle the growing market share of collaborative robots.
The solution to this problem is often the use of original hands designed and manufactured by end-users and SIers, but the problem with both air and electric gripper drive systems is the wiring.
The "KIT-COBOT-WIRE" series is one of the kits to effectively utilize the IO at the wrist and minimize the wiring along the arm.
設計をする前の配線イメージ
Y端子やコネクタで中継をする以外の方法がなく、この端子台やコネクタを設置する場所・配線を固定する場所を設ける必要が出てきます。
そのため、ジマテックでは「配線の自由度(ロボットブランドとグリッパーメーカーの仕様差異のつじつまを合わせることができる)」と「現場での使いやすさ」の両立を目指しました。
その1つの回答が、この「KIT-COBOT-WIRE」です。
小型の端子台を3Dプリンタ(PA12・ナイロン製)のハウジングで囲い、その内部でロボット側とグリッパー側の配線を中継します。
電動グリッパーの場合、手首部からの配線のみで動作できるグリッパーも弊社・他社製も増えてきており、アーム沿いの配線をなくす(もしくはカメラや照明など最低限のものへ減らす)ことに役立ちます。
エアー用の電磁弁や吸着確認のセンサーをハンド上に設置した場合も同様に、エアーチューブはアーム添いに固定する必要はありますが、ハンドの制御用のIO線は手首部に集中させることができるため、断線のリスクを最低限に抑えることが可能です。
There is no other way but to use Y terminals or connectors for relaying, and it becomes necessary to provide a place to install these terminal blocks and connectors and a place to fix the wiring.
Therefore, Gimatic-Japan aimed to achieve both "wiring flexibility (to allow reconciliation of differences in specifications between robot brands and gripper manufacturers)" and "ease of use onsite.
One answer is the KIT-COBOT-WIRE.
A small terminal block is enclosed in a 3D printer (made of PA12 nylon) housing, and the wiring between the robot side and the gripper side is relayed inside the housing.
In the case of electric grippers, there are an increasing number of grippers, both ours and those made by other companies, that can be operated only by wiring from the wrist, which helps to eliminate wiring along the arm (or reduce it to a minimum, such as cameras and lighting).
Similarly, when a solenoid valve for air or a sensor to check suction is installed on the hand, the air tube needs to be fixed along the arm, but the IO wires for hand control can be concentrated at the wrist to minimize the risk of wire breakage.
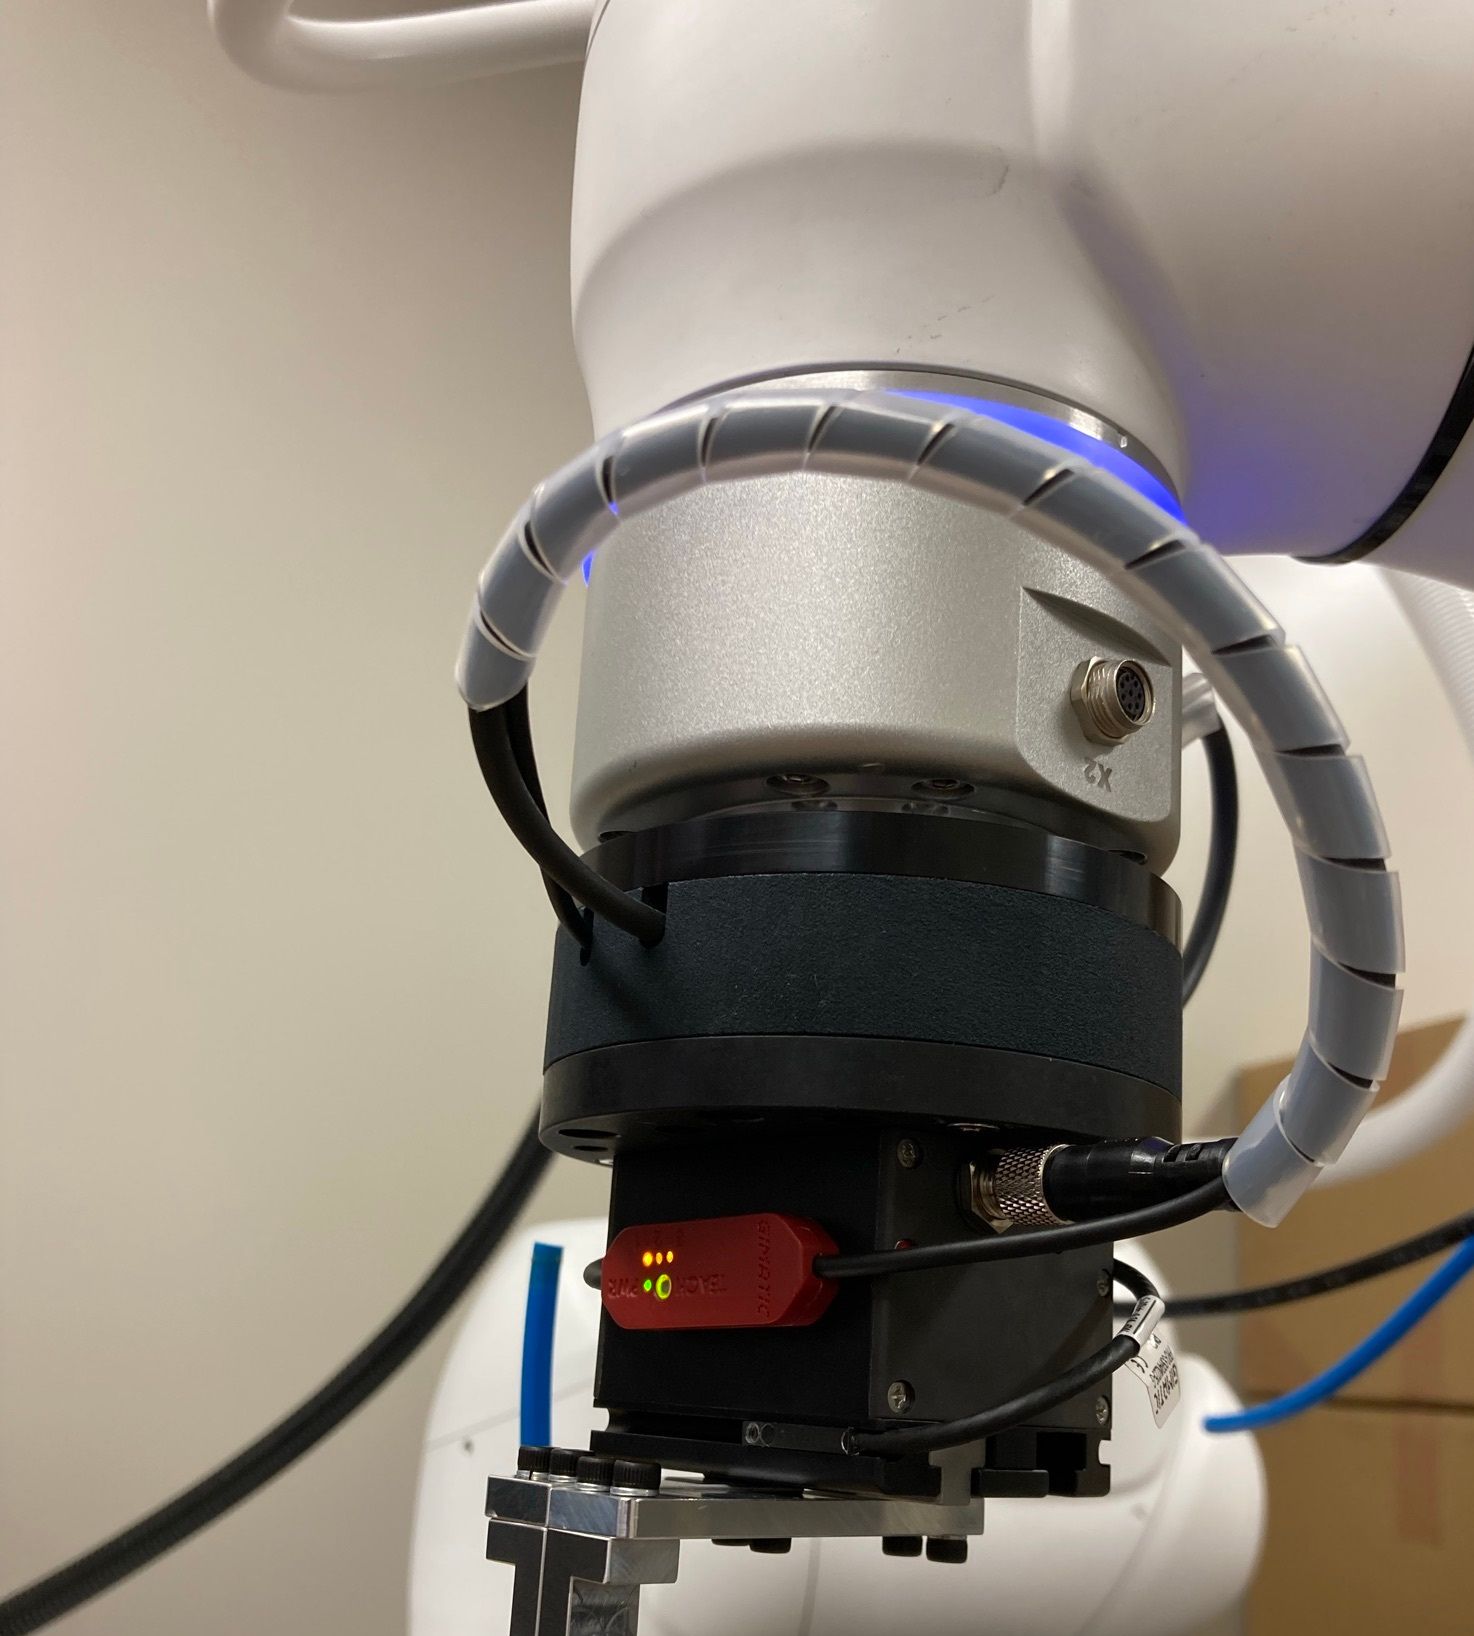
実際にロボットに取り付けたときの画像
ジマテック標準フランジを使って取り付け。
PCD31.5mm(4-M5)と、PCD50mm(4-M6)に対応。
グリッパー取り付け用の汎用フランジ(MFI-A374-B)とキットで販売されているため、
ジマテックの電動グリッパー全機種とセンサーの組み合わせをロボットブランドの仕様に合わせ、取り付けが可能に。
Mounted using Gimatic standard flange(3M350051).
Compatible with PCD 31.5mm (4-M5) and PCD 50mm (4-M6).
Sold as a kit with a general-purpose flange (MFI-A374-B) for gripper installation, it can be used with all Gimatic electric grippers.
All Gimatic's electric gripper models and sensors can be combined and installed according to the specifications of the robot brand.